1. requests
welcome

1.1 为什么要学 requests,而不是 urllib
1.requests 的底层实现就是 urllib
2.requests 在 Python2 和 Python3 中通用,方法完全一样
3.requests 简单易用
4.requests 能够自动帮我们解压(gzip 压缩的)网页内容
1.2 requests 的作用
作用:发送网络请求,返回相应的数据
中文文档:http://2.python-requests.org/zh_CN/latest/
1.3 requests 中解决编码的方法
import requests
url = ‘https://www.baidu.com’response = requests.get(url)# 一response.encoding = ‘utf-8’# 二print(response.content.decode(‘utf-8’))response.content.decode(‘gbk’)response.text
如果一个网页,你不知道他是怎么编码的或者这个网页并没有告诉你这个网页的如何编码的。那我们就可以使用自动编码 (自动检测编码方式):
import requests
url = ‘http:www.qmaile.com’req = requests.get(url)req.encoding = req.apparent_encoding# 等价于req.encoding = ‘utf-8’print(req.text)
1.4 response.text 和 response.content 的区别
print(type(response.text))# str,文本print(type(responser.content))# 字节,图片、视频、音频
| 类型 |
str |
bytes |
| 修改编码方式 | response.encoding = ‘utf-8’ | response.content.decode(‘utf-8’) |
Tips:
产生乱码的根本原因就是编码解码不一致造成的。
1.5 发送简单的请求
response = requests.get(url)
# requests 的常用方法response.textresponse.contentresponse.status_coderesponse.request.headers # 请求头response.headers # 响应头
1.6 请求方式
| GET | 向指定的资源发出 “显示” 请求,使用 GET 方法应该只用在读取数据。(请求源代码) |
| HEAD | 与 GET 方法一样,都是向服务器发出指定资源的请求。只不过服务器将不传回资源的文本部分。(在后端和前端交互的时候会使用的比较多,restful——前端与后端相处的接口。平时我们所说的前后端分离,就是 restful)也就是会只返回 Response Headers 以很少网络流量获得概要信息 |
| POST | 向指定资源提交数据,请求服务器进行处理(例如提交表单或者上传文件)。 |
| PUT | 向指定资源位置上传最新内容。 |
| DELETE | 请求服务器删除 Requests-URL 所标识的资源。 |
| TRACE | 回显服务器收到的请求,主要用于测试或诊断。 |
| OPTIONS | 这个方法可使服务器传回该资源的所支持的所有 HTTP 请求方法。 |
| CONNECT | HTTP/1.1 协议中预留给能够连接改为管道方式的代理服务器。 |
| PATCH | 用于将局部修改应用到资源。 |
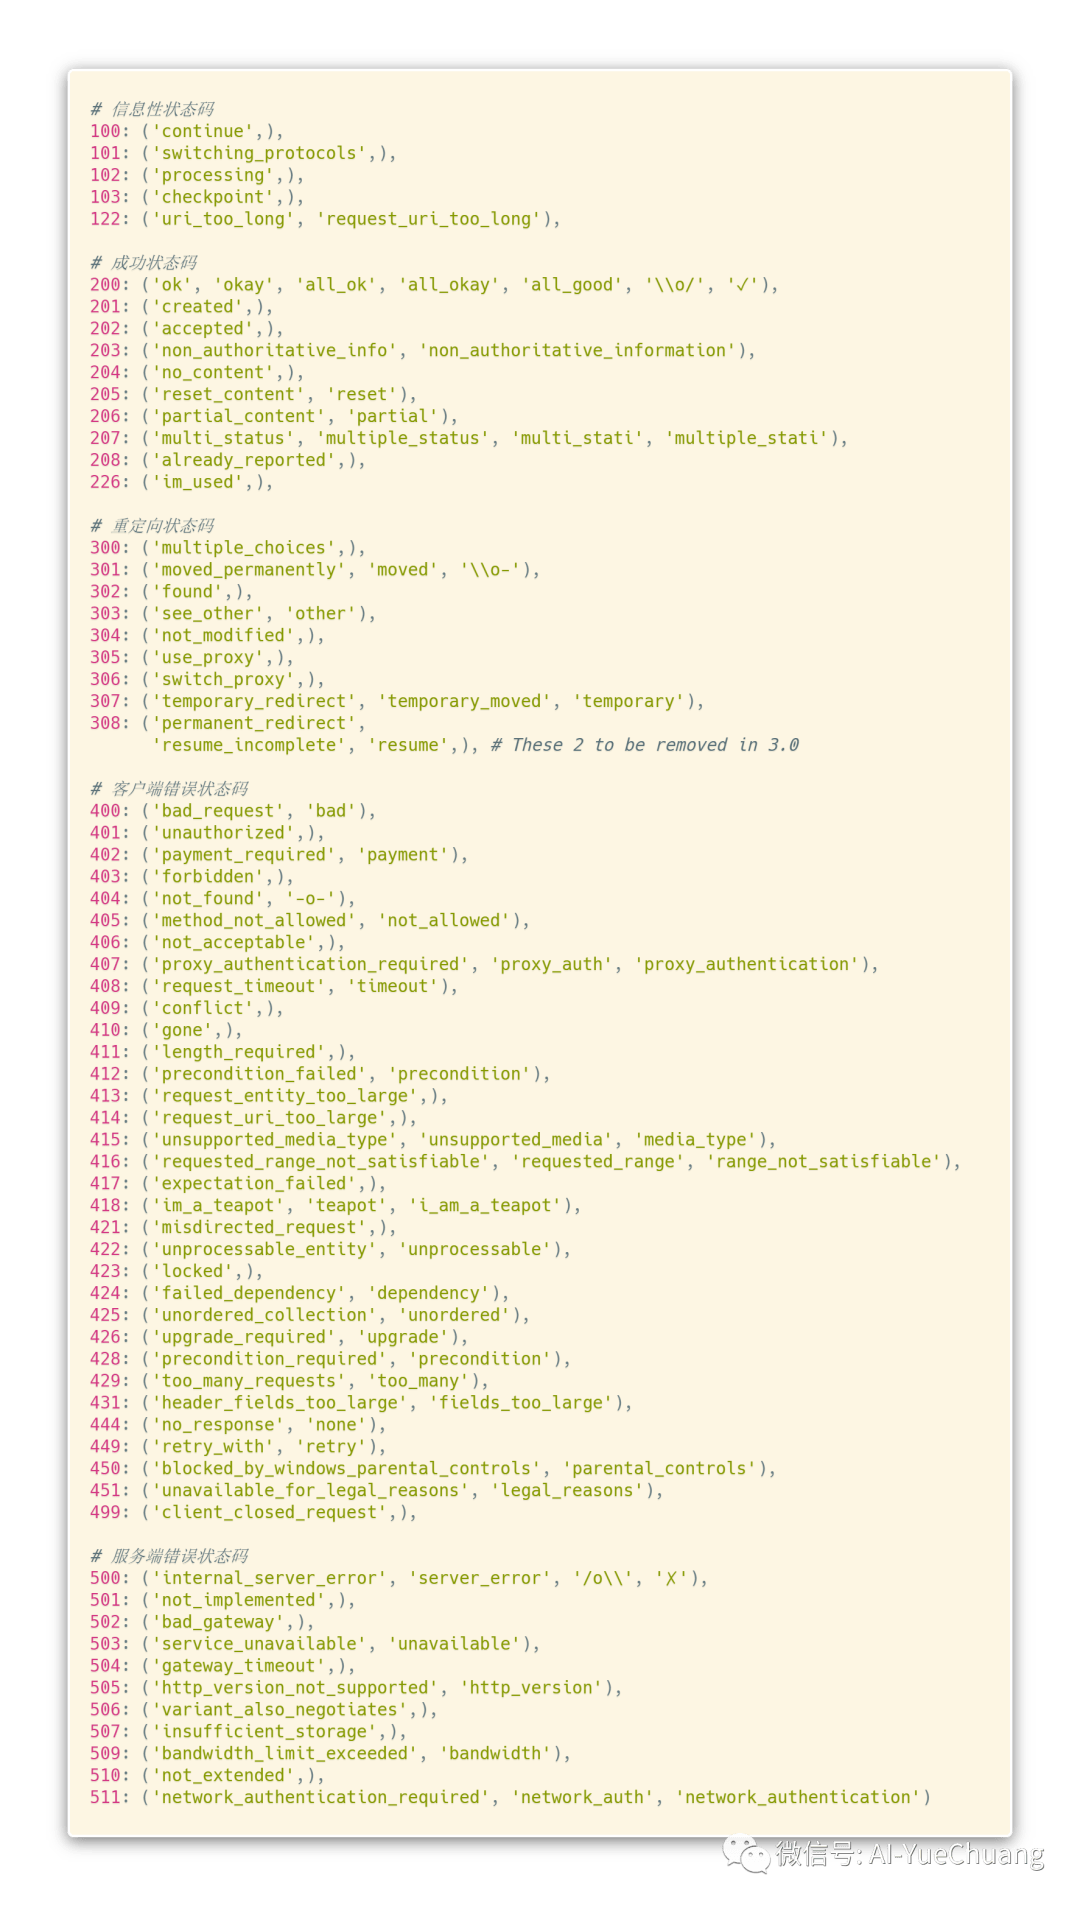
1.7 状态码
| 5xx | 就是响应,这个服务器挂了。这个就和你电脑没有任何关系。(你的浏览器、你的客户端没有问题,只不过,我本身不能为你提供服务了。) |
| 2xx | 以2开头的基本上是没问题的,是可以正常返回数据的。 |
| 201 | 请求开始创建了 |
| 202 | 请求创建之后,服务器接受了 |
| 204 | 就是返回的这个,没有内容(信息) |
| 206 | 放回部分信息(一般是返回图片)举个例子就是,有时候我们访问网站的时候,有些图标是模糊不清的,这时候后台就会默默的发起一个206 的请求。这样图片就过几秒就清晰了。 |
| 3xx | 一般是重定向(有时候,你访问的是另一个网站,这时候有时候网站会给你重定向跳转到另一个网页,也就是我们的 30几 |
| 301 | 永久移动 |
| 302 | 暂时移动 |
| 4xx | 出错啦 |
| 401 | 未验证,也就是:那个页面需要你登陆一些个人信息,如果直接访问,它就会出现 401 页面 |
| 403 | 说明你的 IP 被封了,它禁止你登陆咯 |
| 404 | 你有可能路由写错了 |
| 405 | 就是这个页面原本只能用 get 方法来请求,而你却用 Post 的方法来请求,提醒你,你是不是写错了 |
| 408 | 请求超时(有可能是你服务器的问题,当然也有可能是你的问题。一般来说:个人问题居多) |
| 5xx | 就是网站崩了,网关不支持、没有挂载啥的 |
代码英文如下图所示:
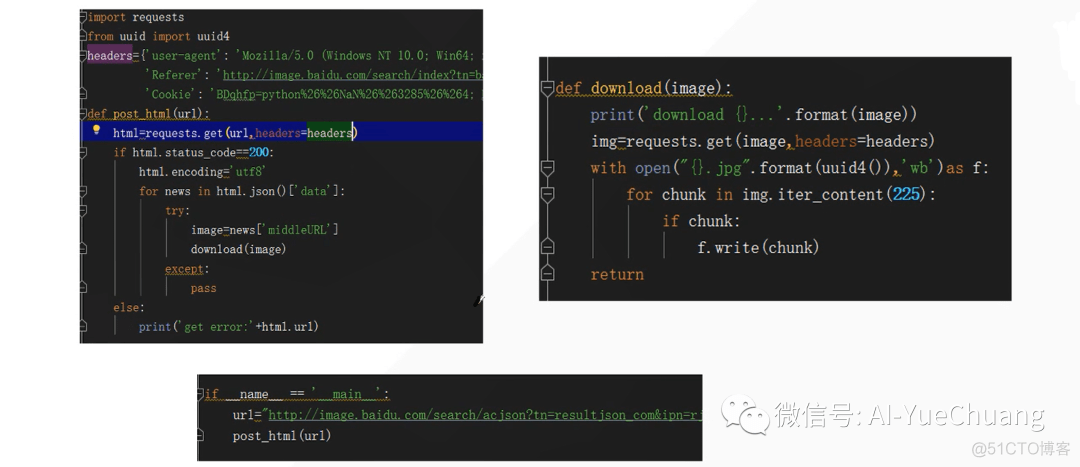
1.8 下载图片
1.9 贴吧练习
目标抓取页面,保存成 HTML 即可。
“””project = ‘Code’, file_name = ‘spider’, author = ‘AI悦创’time = ‘2020/3/22 19:27’, product_name = PyCharm# code is far away from bugs with the god animal protecting I love animals. They taste delicious.”””import requestsfrom requests.exceptions import RequestExceptionclass TiebaSpider(object): def __init__(self, tieba_name): self.tieba_name = tieba_name self.url_temp = “https://tieba.baidu.com/f?kw=” + tieba_name + “&ie=utf-8&pn={}” self.headers = {‘User-Agent’: ‘Mozilla/5.0 (Windows NT 10.0; Win64; x64) AppleWebKit/537.36 (KHTML, like Gecko) Chrome/80.0.3987.149 Safari/537.36’} def get_url_list(self):”””构造 Url””” return [self.url_temp.format(i * 50) for i in range(10)]
def parse_url(self, url): print(url) try: html = requests.get(url, self.headers) if html.status_code == 200: return html.text return None except RequestException: return None def save_html(self, index, html): with open(f’第{index}页.html’, ‘wb’)as f: f.write(html.encode())# f.write(html.encode(‘utf8′))# with open(f’第{index}页.html’, ‘w’, encoding=’utf-8′)as f:# f.write(html) def run(self):”””实现主要的业务方法”””# 1. 构造 url 列表 tieba_url_list = self.get_url_list()# 2. 遍历发送请求获取响应 for index, tburl in enumerate(tieba_url_list): html = self.parse_url(tburl)# 保存页面 self.save_html(index, html)
if __name__ == ‘__main__’: tb_spider = TiebaSpider(‘美女’) tb_spider.run()
1.10 requests 深入
1.10.1 发送 POST 请求
哪些地方我们会使用到 POST 请求:
登陆注册(POST 比 Get 安全)
需要传输大文本的时候(POST 请求对数据长度没有要求)
Js 破解时,传输数据。(比如:有道翻译)
爬虫也需要在这两个地方模拟浏览器发送 POST 请求。
# 用法response = requests.post(“http://www.baidu.com/”, data = data, headers = headers)
1.11 百度翻译案例/有道翻译
(涉及进阶知识,这里就补充一个小技巧,之后更新)
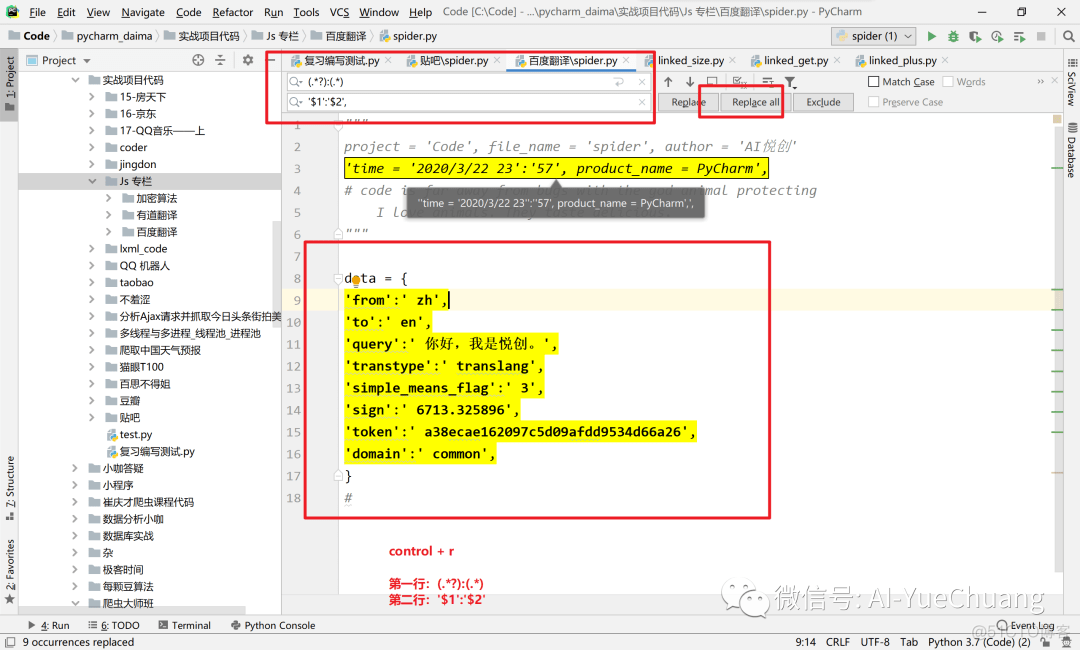
快捷键:Control + R,使用正则表达式匹配。
1.12 使用代理
问题:为什么爬虫需要使用代理
让服务器以为不是同一个客户端在请求(示例:百度统计——AI悦创博客)
防止我们真实的地址被泄露,防止被追究。

正常请求时没有中间的代理,当有了代理则类似于中间商。(没有中间商赚差价)哈哈哈哈
用法:requests.get(‘http://www.baidu.com’, proxies = proxies)
proxies 的形式:字典(dict)proxies = { ‘http’:’socks5://127.0.0.1:1080′, ‘https’:’socks5://127.0.0.1:1080′, }

案例:
代理设置Requests 和 Scrapy 中的代理 IP 设置
代理测试
学到这里,同学们会发现,为什么要写成:
html = requests.get(url, headers = headers, data = data)
数据传入都是字典,为什么我们不能直接传进去呢?
优点:
可读性高
数据不会错乱
1.13 Cookies 和 Session
-
Cookies 数据存放在客户端的浏览器上,Session 数据放在服务器上
-
Cookies 不是很安全,别人可以分析存放在本地的 Cookies 并进行 Cookies 欺骗
-
Session 会在一定时间内保存在服务器上。当访问增多,会比较占用你服务器的性能
-
单个 Cookies 保存的数据不能超过 4k,很多浏览器都限制一个站点最多保存 20个 Cookies
1.14 爬虫处理 Cookies 和 Session
带上 Cookies、Session 的好处:能够请求到登陆之后的页面
带上 Cookies、Session 的弊端:一套 Cookies 和 Session 往往和一个用户对应的请求太多,请求次数太多,容易被服务器识别为爬虫。
不需要 Cookies 的时候尽量不去使用 Cookies
但是为了获取登陆之后的页面,我们必须发送带有 Cookies 的请求。
# requests 提供了一个叫做 session 类,来实现客户端和服务端的会话
# 使用方法# 1. 实例化一个 Session 对象# 2. 让 Session 发送 get 或者 Post 请求
session = requests.session()response = session.get(url, headers = headers)

请求登陆之后的网站思路
实例化 Session
先使用 Session 发送请求,登陆对应网站,把 Cookies 保存在 Session 中
再使用 Session 请求登陆之后才能访问的网站,Session 能够自动携带登陆成功时所保存的在其中的 Cookies,并进行请求。
登陆人人网
“””
project = ‘Code’, file_name = ‘spider.py’, author = ‘AI悦创’
time = ‘2020/4/3 9:56’, product_name = PyCharm
# code is far away from bugs with the god animal protecting
I love animals. They taste delicious.
“””
import requests
session = requests.Session()
print(session)
session = requests.session()
print(session)
# 输出
<requests.sessions.Session object at 0x00000255D5400F48>
<requests.sessions.Session object at 0x00000255D63F85C8>
实际操作:
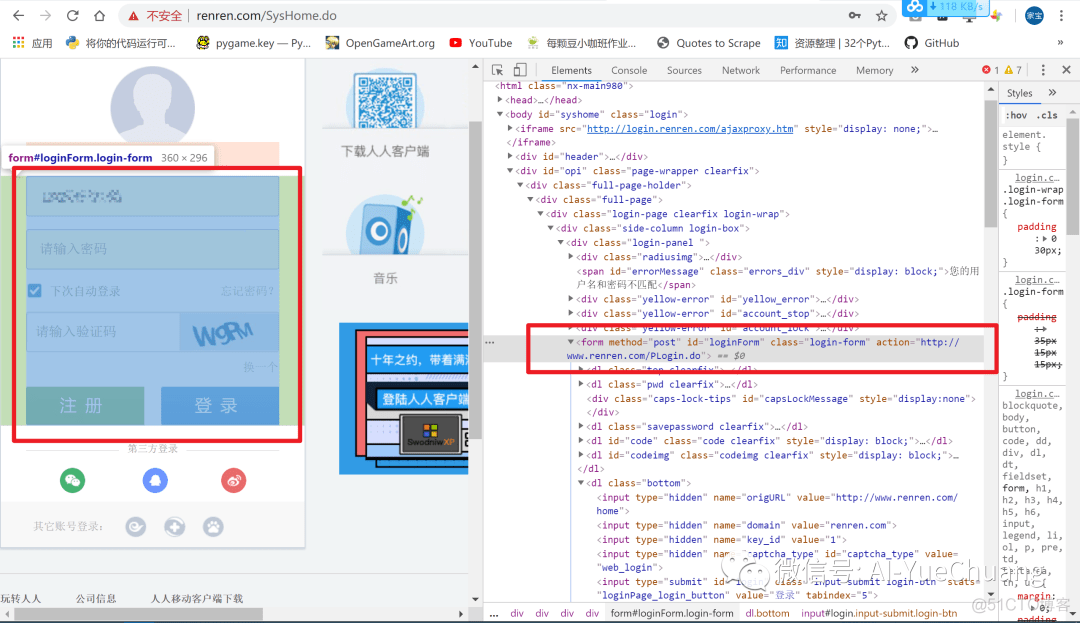
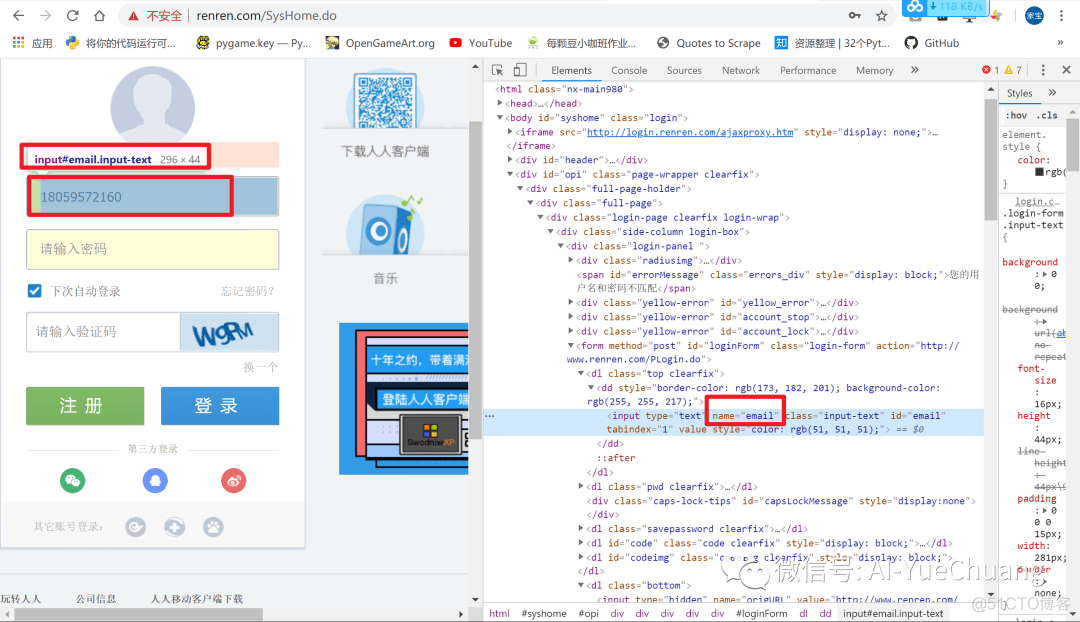
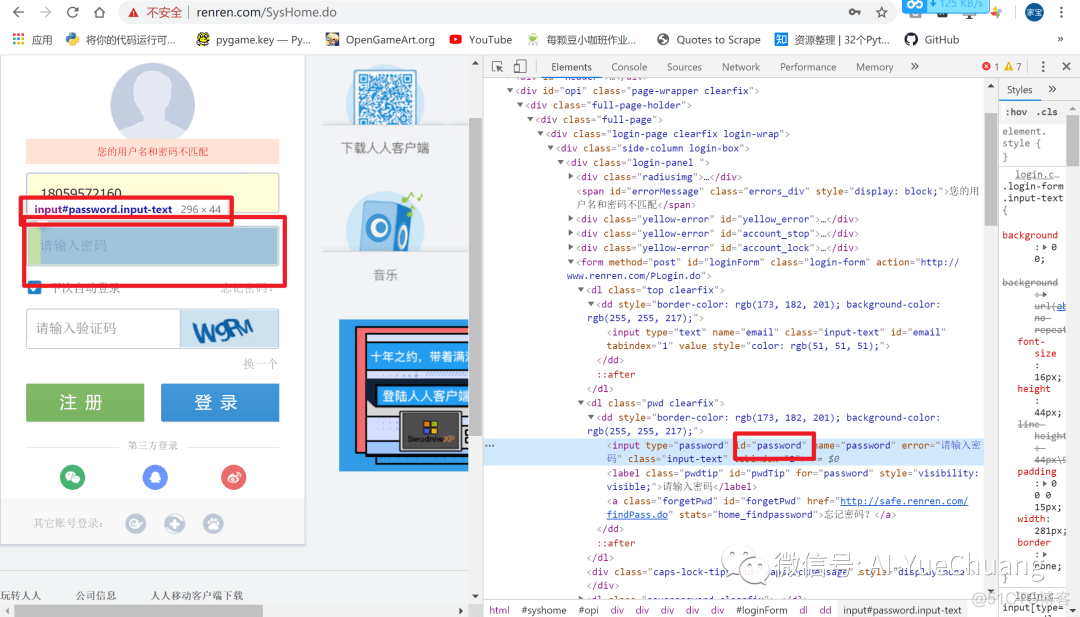
第一种:通过 form 表单提交,到 form 的 url:http://www.renren.com/PLogin.do
优点:参数少,对应的参数直接获取表单中对应的类名、id 名称。

密码总不能让大家看见,怎么办呢?
我们可以写个配置文件,然后读取进来。(当然,如果你不介意的化,也没事)
这里我在源代码文件同一个文件夹下创建一个,password.ini,我们要怎么写呢?可以按如下来写:
rr_pwd:123 # 假定 123是你的密码

那么接下来问题来了,我们要怎么调用配置文件呢?使用以下的库:
from configparser import ConfigParser
# 实例化:cfg = ConfigParser()r = cfg.read(‘password.ini’)pwd = cfg.get(‘password’, “rr_pwd”) # 先找 password 中的
然后再找print(pwd)# 输出:123
这样我们就读取到配置文件中的密码了。如果你自己联系则可以不用这样。
“””project = ‘Code’, file_name = ‘spider.py’, author = ‘AI悦创’time = ‘2020/4/3 9:56’, product_name = PyCharm# code is far away from bugs with the god animal protecting I love animals. They taste delicious.”””import requestsfrom configparser import ConfigParserheaders = { ‘User-Agent’: ‘Mozilla/5.0 (Windows NT 10.0; Win64; x64) AppleWebKit/537.36 (KHTML, like Gecko) Chrome/75.0.3770.100 Safari/537.36’,}# 实例化:cfg = ConfigParser()r = cfg.read(‘password.ini’)pwd = cfg.get(‘password’, “rr_pwd”)# print(pwd)
post_url = ‘http://www.renren.com/PLogin.do’
session = requests.Session()
post_data = { ’email’: ‘18059572160’, ‘password’:pwd,}session.post(post_url, data = post_data, headers = headers) # cookies 保存到了 sessionhtml = session.get(‘http://www.renren.com/880883178/profile’)print(html.text)with open(‘AI悦创.html’, ‘w’, encoding=’utf-8′)as f: f.write(html.text)
第二种:通过找 login 接口上传,参数较多。import requests
headers = { ‘User-Agent’: ‘Mozilla/5.0 (Windows NT 10.0; Win64; x64) AppleWebKit/537.36 (KHTML, like Gecko) Chrome/80.0.3987.149 Safari/537.36’, ‘Cookie’: ‘你自己的Cookies’,}
html = requests.get(‘http://www.renren.com/880883178/profile’, headers = headers)with open(‘AI悦创2.html’, ‘w’, encoding=’utf-8′)as f: f.write(html.text)
第三种:requests 自带 cookies 参数,制作 cookies 字典并发起请求,这里仅作参考。不推荐使用。
import requestsheaders = { ‘User-Agent’: ‘Mozilla/5.0 (Windows NT 10.0; Win64; x64) AppleWebKit/537.36 (KHTML, like Gecko) Chrome/80.0.3987.149 Safari/537.36’, ‘Cookie’: ‘anonymid=k8jj61kc9ytcoo; depovince=FJ; _r01_=1; JSESSIONID=abcGCE-KQo8qe_vWUU9ex; ick_login=88197232-5606-4803-adde-71280bdb5ea4; taihe_bi_sdk_uid=7b5d35fcd9ad0afd582b106f4734bce4; taihe_bi_sdk_session=23b8c003b24d8503eb1a5557c6711381; ick=07f09fab-0ee2-4824-ac8a-971ef2959e1a; __utma=151146938.2085067018.1585878674.1585878674.1585878674.1; __utmc=151146938; __utmz=151146938.1585878674.1.1.utmcsr=renren.com|utmccn=(referral)|utmcmd=referral|utmcct=/SysHome.do; first_login_flag=1; ln_uact=18059572160; ln_hurl=http://head.xiaonei.com/photos/0/0/men_main.gif; wp=1; wp_fold=0; loginfrom=null; jebecookies=9916f612-5f2d-43e8-8c6f-33f71c210b4a|||||’,}cookie = “anonymid=k8jj61kc9ytcoo; depovince=FJ; _r01_=1; JSESSIONID=abcGCE-KQo8qe_vWUU9ex; ick_login=88197232-5606-4803-adde-71280bdb5ea4; taihe_bi_sdk_uid=7b5d35fcd9ad0afd582b106f4734bce4; taihe_bi_sdk_session=23b8c003b24d8503eb1a5557c6711381; ick=07f09fab-0ee2-4824-ac8a-971ef2959e1a; __utma=151146938.2085067018.1585878674.1585878674.1585878674.1; __utmc=151146938; __utmz=151146938.1585878674.1.1.utmcsr=renren.com|utmccn=(referral)|utmcmd=referral|utmcct=/SysHome.do; first_login_flag=1; ln_uact=18059572160; ln_hurl=http://head.xiaonei.com/photos/0/0/men_main.gif; wp=1; wp_fold=0; loginfrom=null; jebecookies=9916f612-5f2d-43e8-8c6f-33f71c210b4a|||||”
cookies = {i.split(“=”)[0]:i.split(“=”)[1] for i in cookie.split(“; “)}# print(cookies)
html = requests.get(‘http://www.renren.com/880883178/profile’, headers = headers, cookies = cookies)with open(‘AI悦创3.html’, ‘w’, encoding=’utf-8′)as f: f.write(html.text)
1.15 requests 小技巧
requests.utils.dict_from_cookiejar() 把 cookie 转换为字典
import requests
response = requests.get(“https://www.baidu.com”)coo = requests.utils.dict_from_cookiejar(response.cookies)print(coo)coo = requests.utils.cookiejar_from_dict(coo)print(coo)# 输出{‘BDORZ’: ‘27315’}<RequestsCookieJar[<Cookie BDORZ=27315 for />]>
2. 请求 SSL 证书验证(忽略 SSL 证书验证)
import requestsresponse = requests.get(‘https://www.12306.cn/index/’, verify = False)print(response)
结果会有如下显示,属于正常现象:
InsecureRequestWarning: Unverified HTTPS request is being made to host ‘www.12306.cn’. Adding certificate verification is strongly advised. See: https://urllib3.readthedocs.io/en/latest/advanced-usage.html#ssl-warnings InsecureRequestWarning,
3. 设置超时 timeout
response = requests.get(url, timeout = 3)
4. 配合状态码判断是否请求成功(assert 断言)
assert response.status_code == 200


扩展知识:
Python assert(断言)用于判断一个表达式,在表达式条件为 false 的时候触发异常。
断言可以在条件不满足程序运行的情况下直接返回错误,而不必等待程序运行后出现崩溃的情况,例如我们的代码只能在 Linux 系统下运行,可以先判断当前系统是否符合条件。
语法格式如下:
assert expression
等价于:
if not expression: raise AssertionError
assert 后面也可以紧跟参数:
assert expression [, arguments]
等价于:
if not expression: raise AssertionError(arguments)
以下为 assert 使用实例:
>>> assert True # 条件为 true 正常执行>>> assert False # 条件为 false 触发异常Traceback (most recent call last): File “<stdin>”, line 1, in <module>AssertionError>>> assert 1==1 # 条件为 true 正常执行>>> assert 1==2 # 条件为 false 触发异常Traceback (most recent call last): File “<stdin>”, line 1, in <module>AssertionError
>>> assert 1==2, ‘1 不等于 2’Traceback (most recent call last): File “<stdin>”, line 1, in <module>AssertionError: 1 不等于 2>>>

以下实例判断当前系统是否为 Linux,如果不满足条件则直接触发异常,不必执行接下来的代码:
实例
import sysassert (‘linux’ in sys.platform), “该代码只能在 Linux 下执行”
# 接下来要执行的代码
本篇主要写的是 Python 网络爬虫基础回顾,所以更多可以点击阅读更多:https://www.aiyc.top/archives/225.html
小 demo
import requests
headers = { ‘user-agent’: ‘Mozilla/5.0 (Windows NT 10.0; Win64; x64) AppleWebKit/537.36 (KHTML, like Gecko) Chrome/80.0.3987.149 Safari/537.36’,}
def parse_url(url): response = requests.get(url, headers = headers, timeout = 3) print(response.status_code) assert response.status_code == 200# return response.text return response.content.decode()def parse_html(url): try: html_str = parse_url(url) except: html_str = None return html_str
if __name__ == ‘__main__’: url = ‘https://www.baidu.com/’ print(parse_html(url))
1.16 URL 的编码解码
# Urllib 常用 API
1. urllib.parse.urljoin2. urllib.parse.quote3. urllib.parse.urlsplit4. urllib.parse.urlparse
1. urllib.parse.urljoinfrom urllib import parse
domain = ‘https://bilbil/com/’url = ‘/img_1234’res = domain + urlprint(‘不使用库:>>>’, res)res = parse.urljoin(domain, url)print(‘使用urllib:>>>’, res)
# 输出不使用库:>>> https://bilbil/com//img_1234使用urllib:>>> https://bilbil/img_1234[Finished in 0.2s]
2. urllib.parse.quotefrom urllib import parse
text = ‘http://image.baidu.com/search/acjson?tn=resultjson_com&ipn=rj&ct=201326592&is=&fp=result&queryWord=%E5%A3%81%E7%BA%B8&cl=2&lm=-1&ie=utf-8&oe=utf-8&adpicid=&st=-1&z=&ic=0&hd=&latest=©right=&word=%E5%A3%81%E7%BA%B8&s=&se=&tab=&width=&height=&face=0&istype=2&qc=&nc=1&fr=&expermode=&force=&cg=wallpaper&pn=60&rn=30&gsm=&1568645521643=’unquote = parse.unquote(text)print(unquote,’\n\n’)
quote = parse.quote(text)print(quote)
# 输出http://image.baidu.com/search/acjson?tn=resultjson_com&ipn=rj&ct=201326592&is=&fp=result&queryWord=壁纸&cl=2&lm=-1&ie=utf-8&oe=utf-8&adpicid=&st=-1&z=&ic=0&hd=&latest=©right=&word=壁纸&s=&se=&tab=&width=&height=&face=0&istype=2&qc=&nc=1&fr=&expermode=&force=&cg=wallpaper&pn=60&rn=30&gsm=&1568645521643=
http%3A//image.baidu.com/search/acjson%3Ftn%3Dresultjson_com%26ipn%3Drj%26ct%3D201326592%26is%3D%26fp%3Dresult%26queryWord%3D%25E5%25A3%2581%25E7%25BA%25B8%26cl%3D2%26lm%3D-1%26ie%3Dutf-8%26oe%3Dutf-8%26adpicid%3D%26st%3D-1%26z%3D%26ic%3D0%26hd%3D%26latest%3D%26copyright%3D%26word%3D%25E5%25A3%2581%25E7%25BA%25B8%26s%3D%26se%3D%26tab%3D%26width%3D%26height%3D%26face%3D0%26istype%3D2%26qc%3D%26nc%3D1%26fr%3D%26expermode%3D%26force%3D%26cg%3Dwallpaper%26pn%3D60%26rn%3D30%26gsm%3D%261568645521643%3D[Finished in 0.2s]
3. urllib.parse.urlsplit4. urllib.parse.urlparse
from urllib import parse
url = ‘http://image.baidu.com/search/acjson?tn=resultjson_com&ipn=rj&ct=201326592&is=&fp=result’print(parse.urlsplit(url)) # 分割# print(quote == text)print(parse.urlparse(url)) # 解析(高级一些)
# 输出SplitResult(scheme=’http’, netloc=’image.baidu.com’, path=’/search/acjson’, query=’tn=resultjson_com&ipn=rj&ct=201326592&is=&fp=result’, fragment=”)ParseResult(scheme=’http’, netloc=’image.baidu.com’, path=’/search/acjson’, params=”, query=’tn=resultjson_com&ipn=rj&ct=201326592&is=&fp=result’, fragment=”)[Finished in 0.2s]
1.17 retrying
上面我们设置了超时,我刚刚的 timeout 只能保证超时之后就不再请求了,那如果我们想要它超时之后再来发一次请求的话,该如何操作呢?这个时候我们就会用到 retrying
# -*- coding: utf-8 -*-# @Author: clela# @Date: 2020-03-24 13:54:27# @Last Modified by: clela# @Last Modified time: 2020-04-03 20:12:34# @公众号:AI悦创import requestsfrom retrying import retryheaders = { ‘user-agent’: ‘Mozilla/5.0 (Windows NT 10.0; Win64; x64) AppleWebKit/537.36 (KHTML, like Gecko) Chrome/80.0.3987.149 Safari/537.36’,}@retry(stop_max_attempt_number = 3)def parse_url(url): print(“代码执行了几次?”) response = requests.get(url, headers = headers, timeout = 3) assert response.status_code == 200 return response.content.decode()
def main(url): try: html_str = parse_url(url) except: html_str = None return html_str
if __name__ == ‘__main__’: url = “https://wwww.baidu.com” print(main(url))
为了方便观察结果,可以加个列表存储:
if __name__ == ‘__main__’: result_list = [] url = “https://wwww.baiduff.com” result_list.append(main(url)) print(result_list) print(len(result_list))
自行运行代码观察结果,我所能做的就是引导!
2. Json未完待续~~~~~~


神龙|纯净稳定代理IP免费测试>>>>>>>>天启|企业级代理IP免费测试>>>>>>>>IPIPGO|全球住宅代理IP免费测试


