1. 新建项目
在命令行窗口下输入scrapy startproject news,如下

然后就自动创建了相应的文件,如下
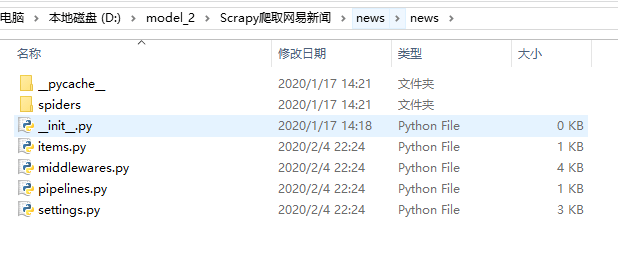
关于每一个文件的作用,上一个博客上有详细介绍,可以回头看一下
2. 修改itmes.py文件
打开scrapy框架自动创建的items.py文件,如下
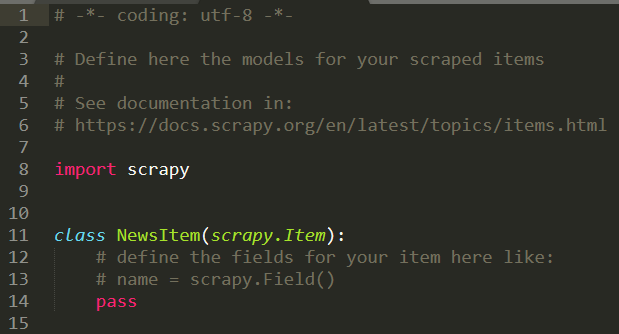
编写里面的代码,确定我要获取的信息,比如线程,新闻标题,url,时间,来源,来源的url,新闻的内容等
import scrapy
class NewsItem(scrapy.Item): # define the fields for your item here like: # name = scrapy.Field() news_thread = scrapy.Field() news_title = scrapy.Field() news_url = scrapy.Field() news_time = scrapy.Field() news_source = scrapy.Field() source_url = scrapy.Field() news_body = scrapy.Field()
3. 定义spider,创建一个爬虫模板
3.1 创建crawl爬虫模板
在命令行窗口下面 创建一个crawl爬虫模板(注意在文件的根目录下面,指令检查别输入错误,-t 表示使用后面的crawl模板),会在spider文件夹生成一个news163.py文件
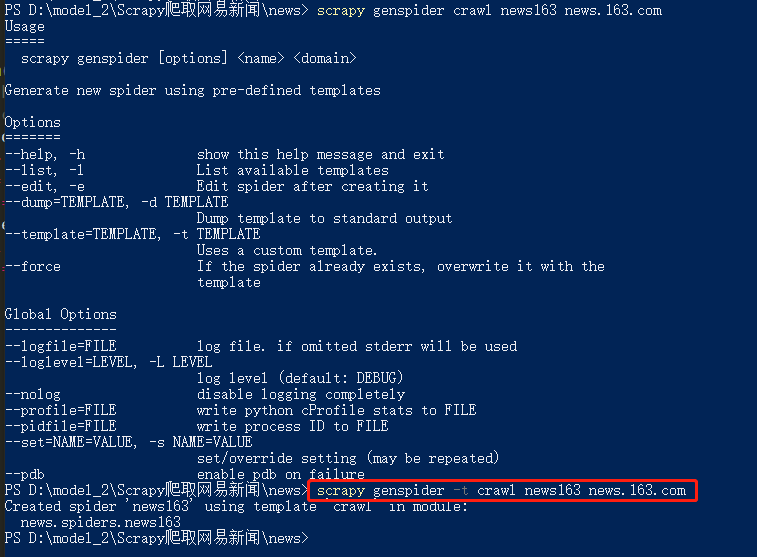
然后看一下这个‘crawl’模板和一般的模板有什么区别,多了链接提取器还有一些爬虫规则,这样就有利于我们做一些深度信息的爬取
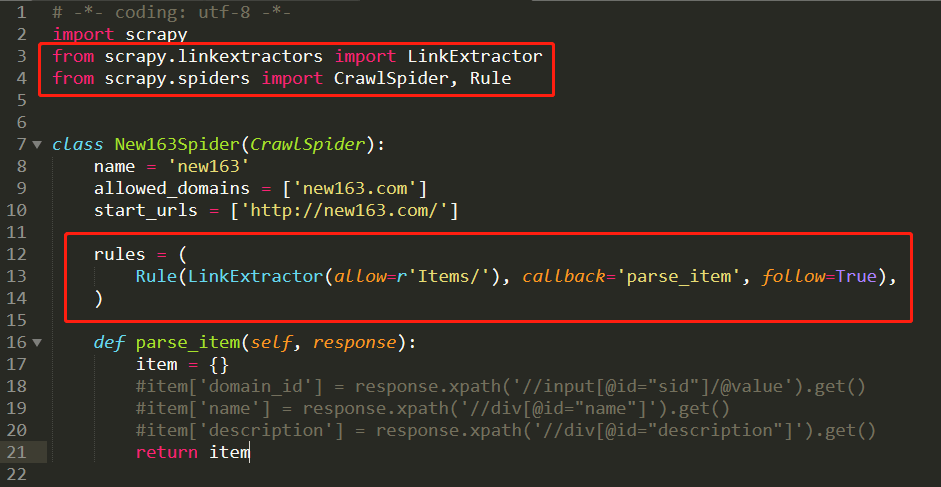
3.2 补充知识点:selectors选择器
支持xpath和css,其中css选择器之前的爬虫案例中介绍过了,这里是补充xpath的操作,xpath语法如下
/html/head/title
/html/head/title/text()
//td (深度提取的话就是两个/)
//div[@class=‘mine’]
3.3. 分析网页内容
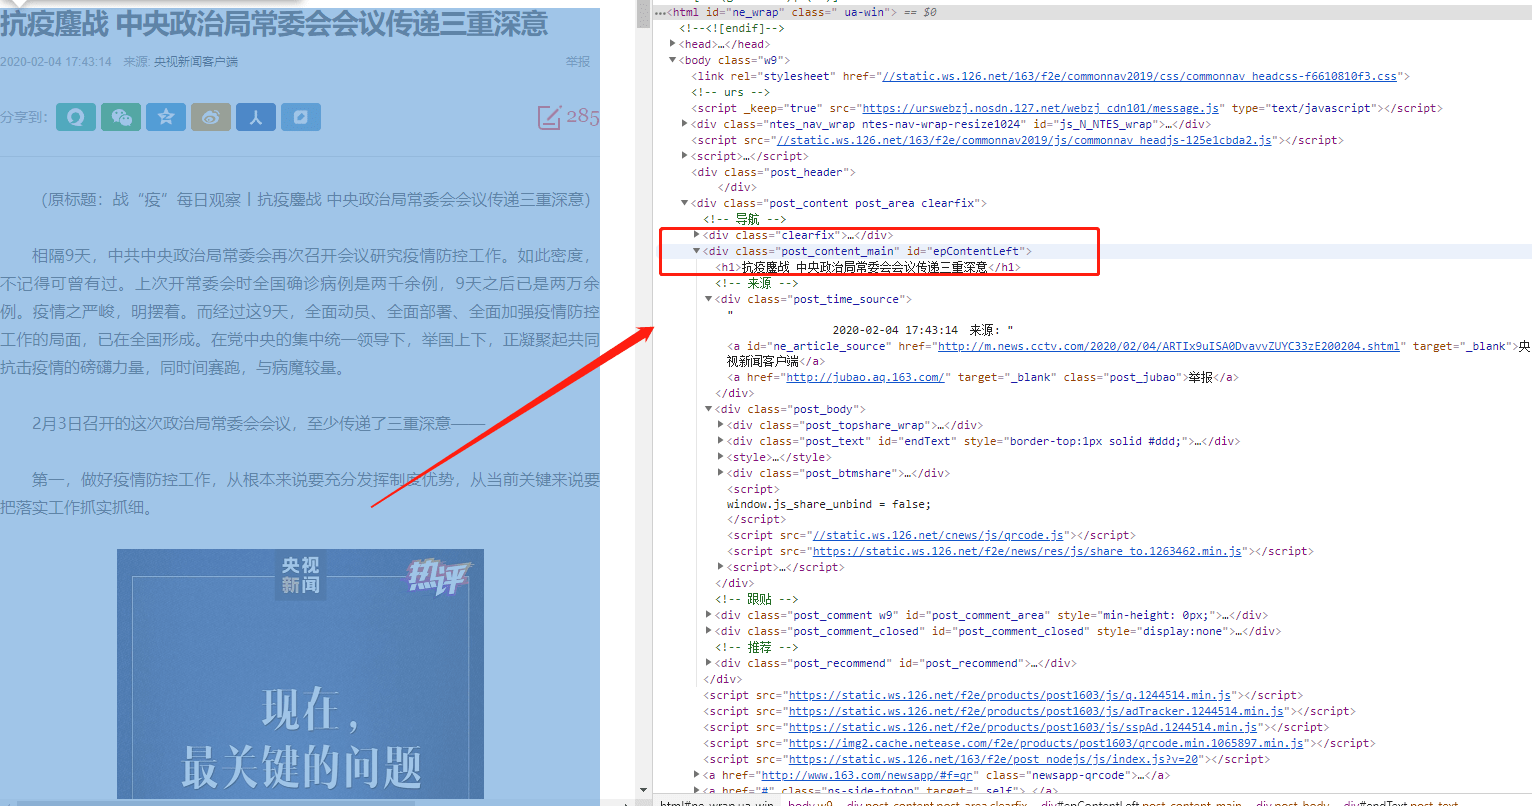
在谷歌chrome浏览器下,打在网页新闻的网站,选择查看源代码,确认我们可以获取到itmes.py文件的内容(其实那里面的要获取的就是查看了网页源代码之后确定可以获取的)
确认标题、时间、url、来源url和内容可以通过检查和标签对应上,比如正文部分
4. 修改spider下创建的爬虫文件
4.1 导入包
打开创建的爬虫模板,进行代码的编写,除了导入系统自动创建的三个库,我们还需要导入news.items(这里就涉及到了包的概念了,最开始说的–init–.py文件存在说明这个文件夹就是一个包可以直接导入,不需要安装)
注意:使用的类ExampleSpider一定要继承自CrawlSpider,因为最开始我们创建的就是一个‘crawl’的爬虫模板,对应上
import scrapy from news.items import NewsItem from scrapy.linkextractors import LinkExtractor from scrapy.spiders import CrawlSpider, Rule
class New163Spider(CrawlSpider): name = 'new163' allowed_domains = ['new163.com'] start_urls = ['http://new163.com/']
rules = ( Rule(LinkExtractor(allow=r'/18/04\d+/*'), callback='parse_news', follow=True), )
def parse_item(self, response): item = {} #item['domain_id'] = response.xpath('//input[@id="sid"]/@value').get() #item['name'] = response.xpath('//div[@id="name"]').get() #item['description'] = response.xpath('//div[@id="description"]').get() return item
Rule(LinkExtractor(allow=r’/18/04\d+/*’), callback=‘parse_news’, follow=True),其中第一个allow里面是书写正则表达式的(也是我们核心要输入的内容),第二个是回调函数,第三个表示是否允许深入
4.2 正则表达式的简单介绍
系统的介绍会在爬虫专项里面进行讲解,这里介绍一些基础性的可以用在这个项目里面的知识点,,正则表达式是由字符和操作符组成的,常见的语法如下图
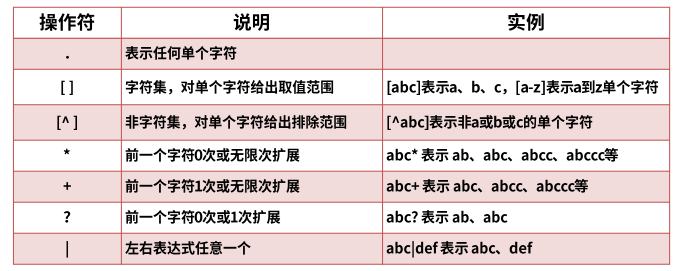

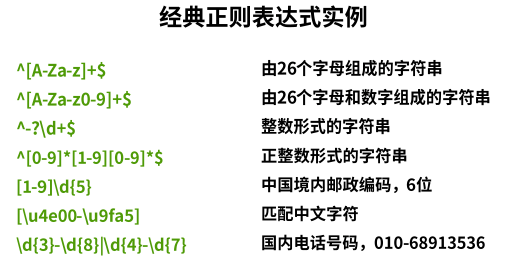
记住一个:“.*?” 惰性匹配,匹配成功一次即可, 几乎可以解决大部分的问题,还有一些需要我们自己动手编写
对比新闻的标签,如下
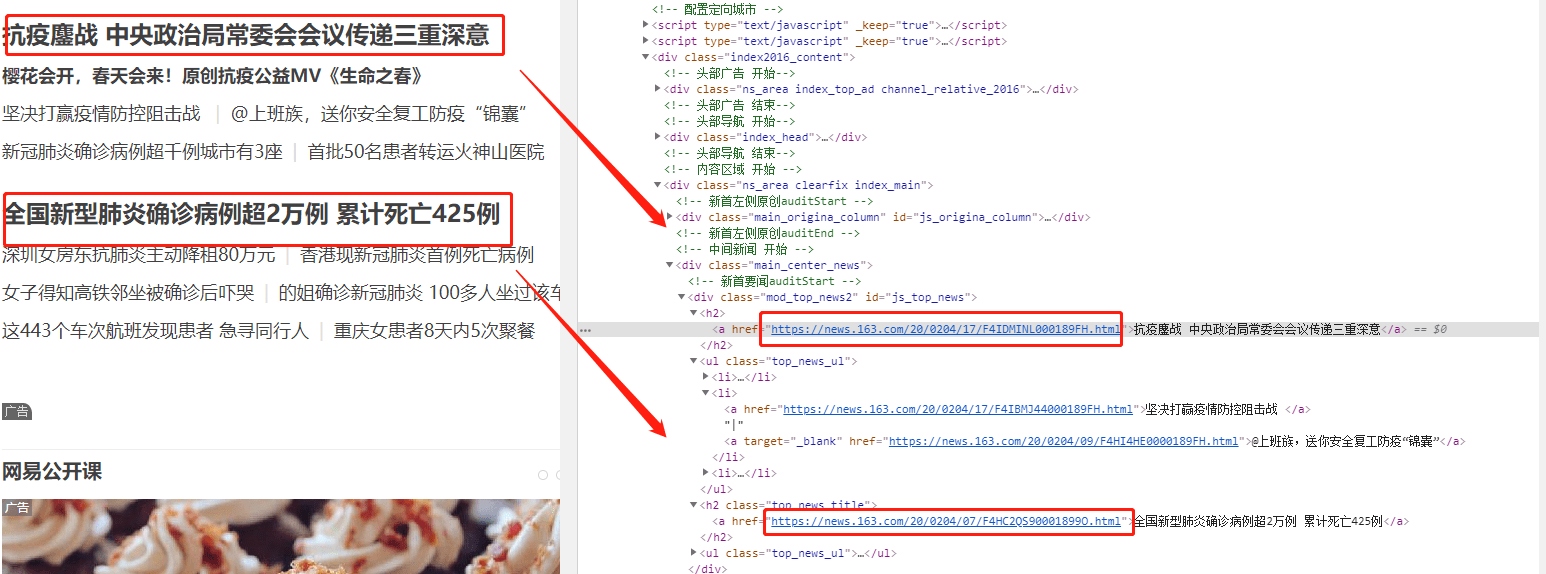
第一个新闻的url是:“https://news.163.com/20/0204/17/F4IDMINL000189FH.html”
第二个新闻的url是:“https://news.163.com/20/0204/07/F4HC2QS90001899O.html”
…
可以看出规律,因此正则表达式可以按照下面这样写
rules = ( Rule(LinkExtractor(allow=r'https://news.163.com/20/0204/\d+/.*?html'), callback='parse_item', follow=True), )
然后在命令行窗口运行指令:scrapy crawl news163
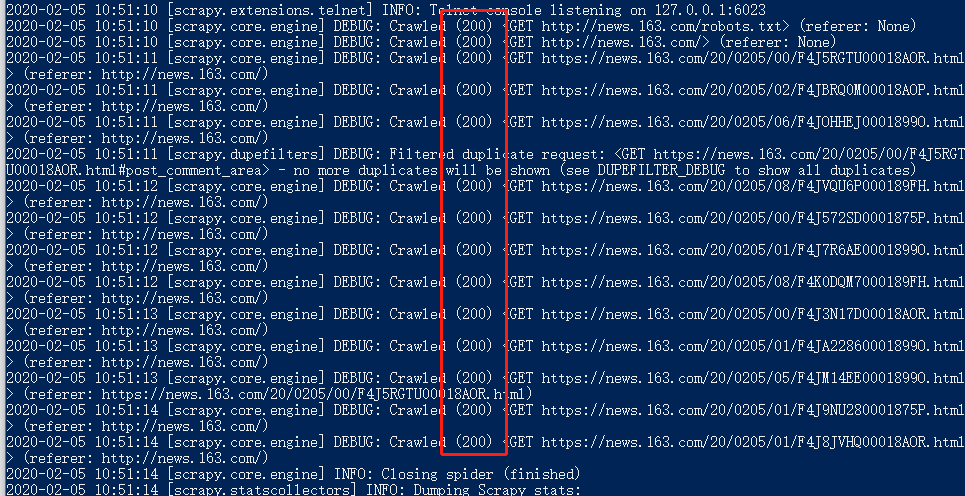
输出结果为:请求返回200,代表请求成功
4.3 回调函数
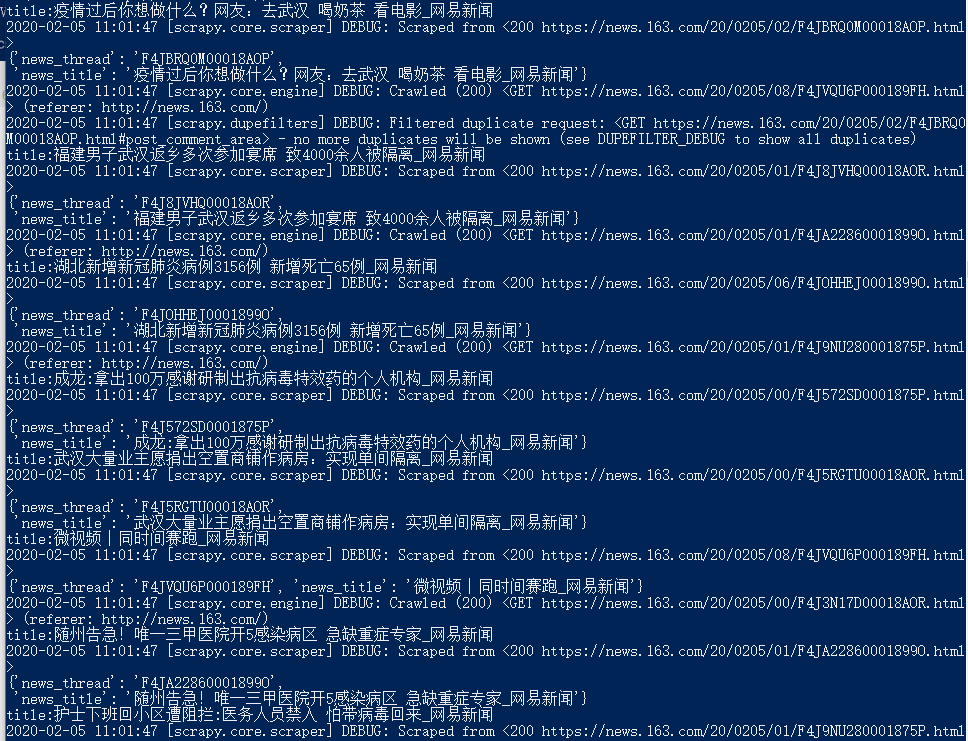
parse_item是我们要设置的回调函数,先处理两个较为简单的获取内容,获取thread(去掉网址的后五个字符的内容)和title(一般就是网页源代码的一个title标签里的内容),代码设置如下
def parse_item(self, response): item = NewsItem() item['news_thread'] = response.url.strip().split("/")[–1][:–5] self.get_title(response,item)
return item
def get_title(self,response,item): title = response.css('title::text').extract() if title: print("title:{}".format(title[0])) item['news_title'] = title[0]
保存后运行命令行窗口,输出如下
然后再获取时间,在页面中选择检查,找到新闻时间对应的源代码中的标签信息,然后采用css选择器,找到该标签信息,如下
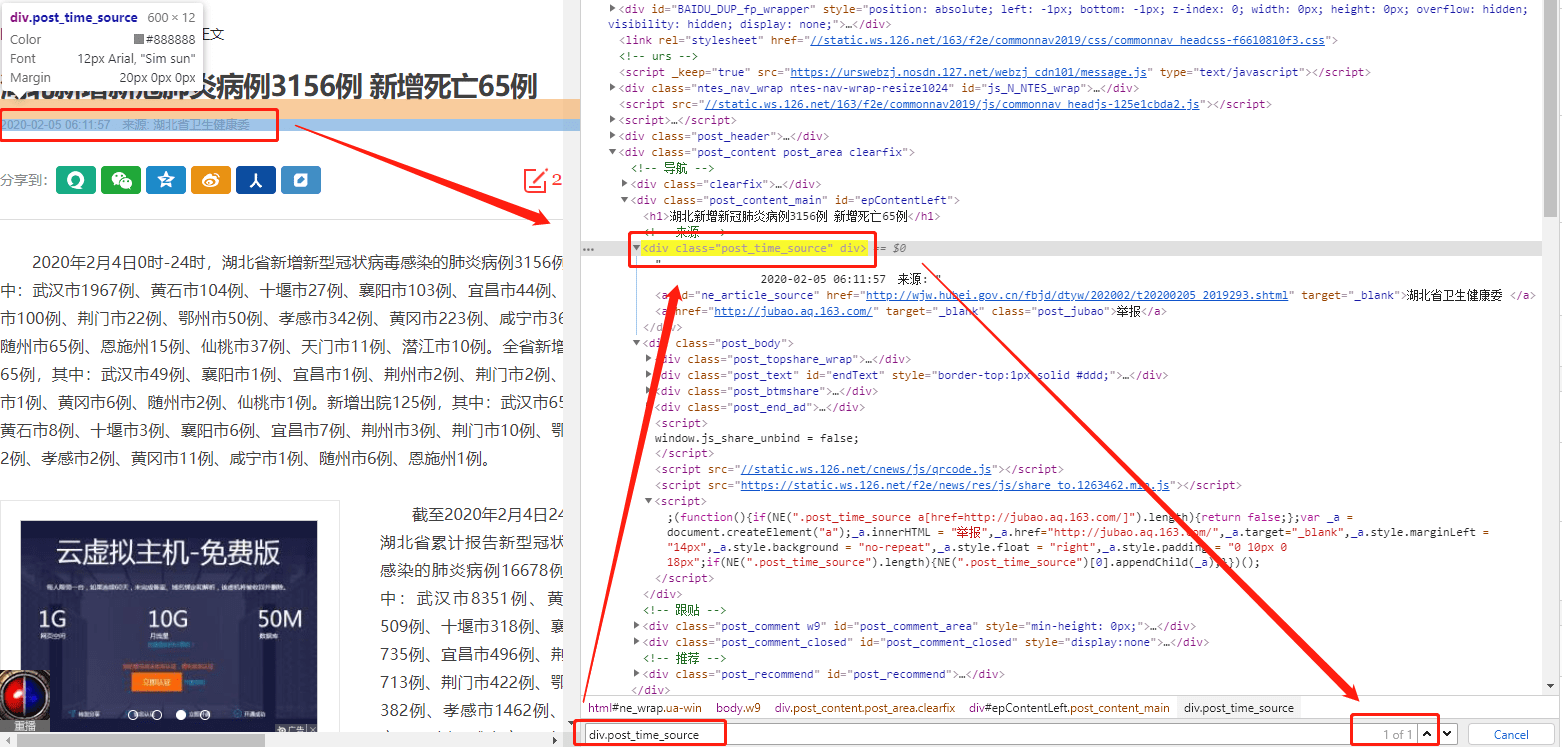
获取新闻时间的代码如下,time后面的内容就是属于字符串处理的方式了,目的是为了获得正常格式的时间数据
self.get_time(response,item) #这个代码要放在回调函数里面
def get_time(self,response,item): time = response.css('div.post_time_source::text').extract() if time: print('time:{}'.format(time[0].strip().replace("来源","").replace('\u3000:',""))) item['news_time'] = time[0].strip().replace("来源","").replace('\u3000:',"")
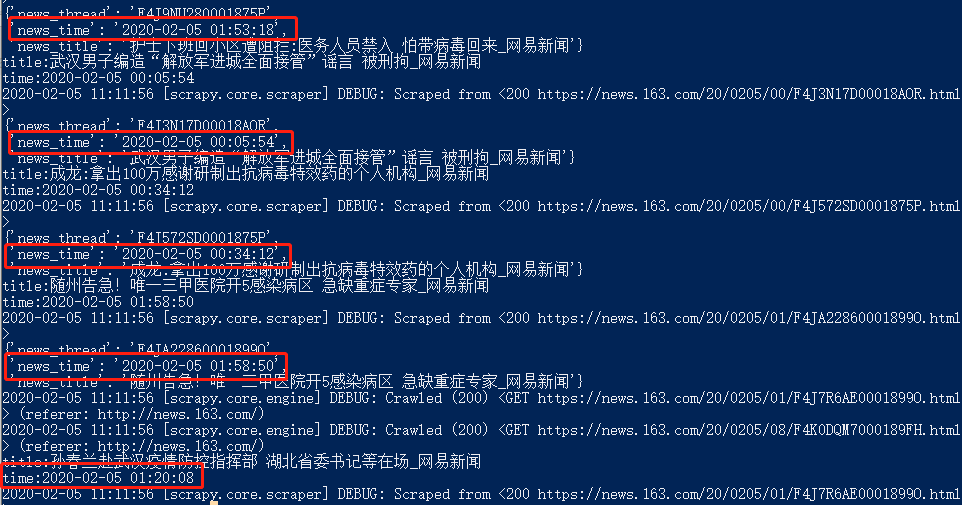
输出结果为:
接下来获取新闻来源,查看网页源代码,发现新闻来源是存储id标签下面,直接就可以进行标签的查找锁定(id唯一)
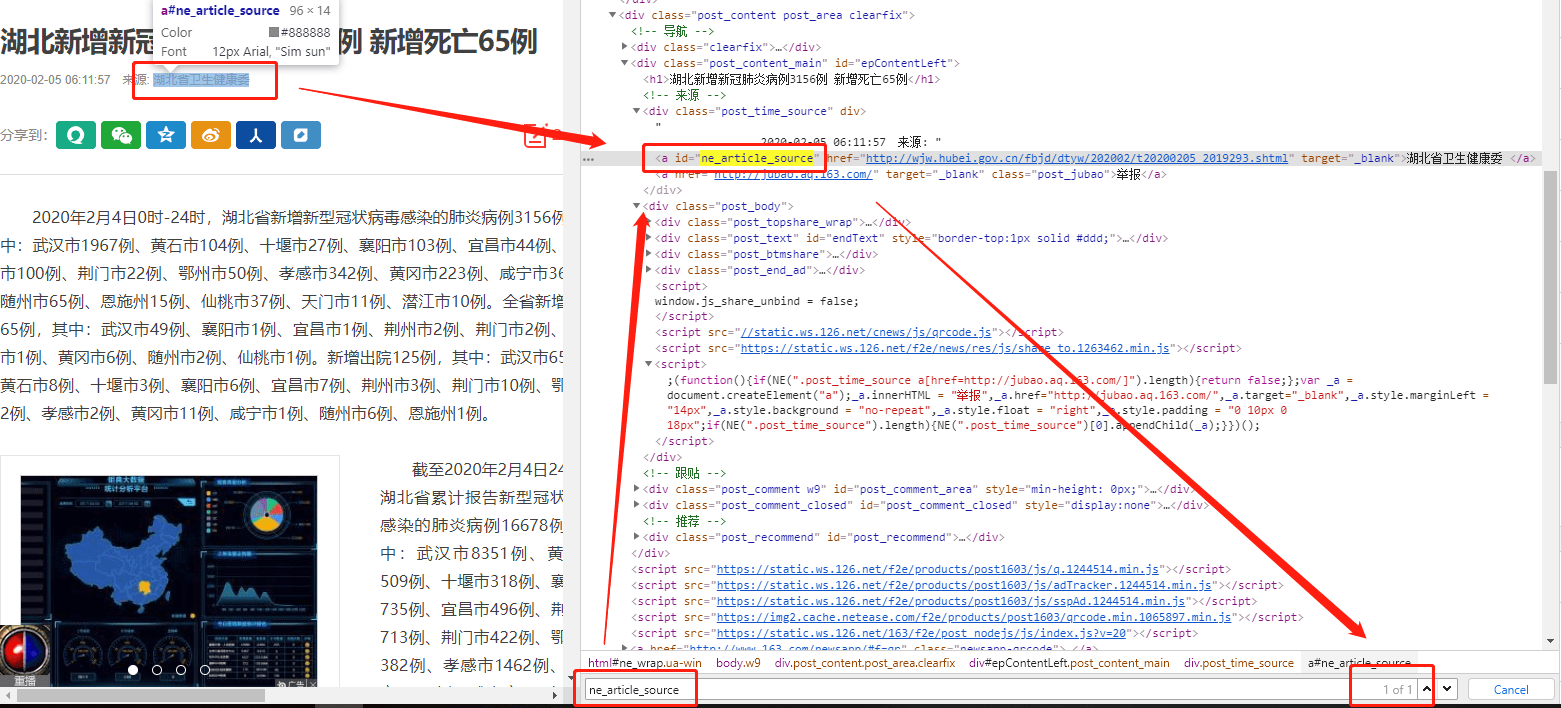
获取新闻来源的代码如下
self.get_source(response,item) #这个代码要放在回调函数里面
def get_source(self,response,item): source = response.css("ne_article_source::text").extract() if source: print("source:{}".format(source[0])) item['news_source'] = source[0]
获取新闻原文URL的方式也是类似,这里直接给出代码(注意这里不是获取id标签的文本内容了,而是属性)
self.get_source_url(response,item)
def get_source_url(self,response,item): source_url = response.css("ne_article_source::attr(href)").extract() if source_url: print("source_url:{}".format(source_url[0])) item['source_url'] = source_url[0]
获取新闻内容 ,也是直接给出参考代码如下
self.get_text(response,item)
def get_text(self,response,item): text = response.css(".post_text p::text").extract() if text: print("text:{}".format(text)) item['news_body'] = text
获取新闻URL(最初的那个),也是直接给出参考代码如下
self.get_url(response,item)
def get_url(self,response,item): url = response.url if url: item['news_url'] = url
至此news163.py的全部代码编写如下:
import scrapy from news.items import NewsItem from scrapy.linkextractors import LinkExtractor from scrapy.spiders import CrawlSpider, Rule
#https://news.163.com/20/0205/06/F4JOHHEJ0001899O.html #https://news.163.com/20/0205/08/F4JVQU6P000189FH.html class News163Spider(CrawlSpider): name = 'news163' allowed_domains = ['news.163.com'] start_urls = ['http://news.163.com/']
rules = ( Rule(LinkExtractor(allow=r'https://news.163.com/20/0205/\d+/.*?html'), callback='parse_item', follow=True), )
def parse_item(self, response): item = NewsItem() item['news_thread'] = response.url.strip().split("/")[–1][:–5] self.get_title(response,item) self.get_time(response,item) self.get_source(response,item) self.get_source_url(response,item) self.get_text(response,item) self.get_url(response,item)
return item
def get_url(self,response,item): url = response.url if url: item['news_url'] = url
def get_text(self,response,item): text = response.css(".post_text p::text").extract() if text: print("text:{}".format(text)) item['news_body'] = text
def get_source_url(self,response,item): source_url = response.css("ne_article_source::attr(href)").extract() if source_url: #print("source_url:{}".format(source_url[0])) item['source_url'] = source_url[0]
def get_source(self,response,item): source = response.css("ne_article_source::text").extract() if source: print("source:{}".format(source[0])) item['news_source'] = source[0]
def get_time(self,response,item): time = response.css('div.post_time_source::text').extract() if time: print('time:{}'.format(time[0].strip().replace("来源","").replace('\u3000:',""))) item['news_time'] = time[0].strip().replace("来源","").replace('\u3000:',"")
def get_title(self,response,item): title = response.css('title::text').extract() if title: print("title:{}".format(title[0])) item['news_title'] = title[0]
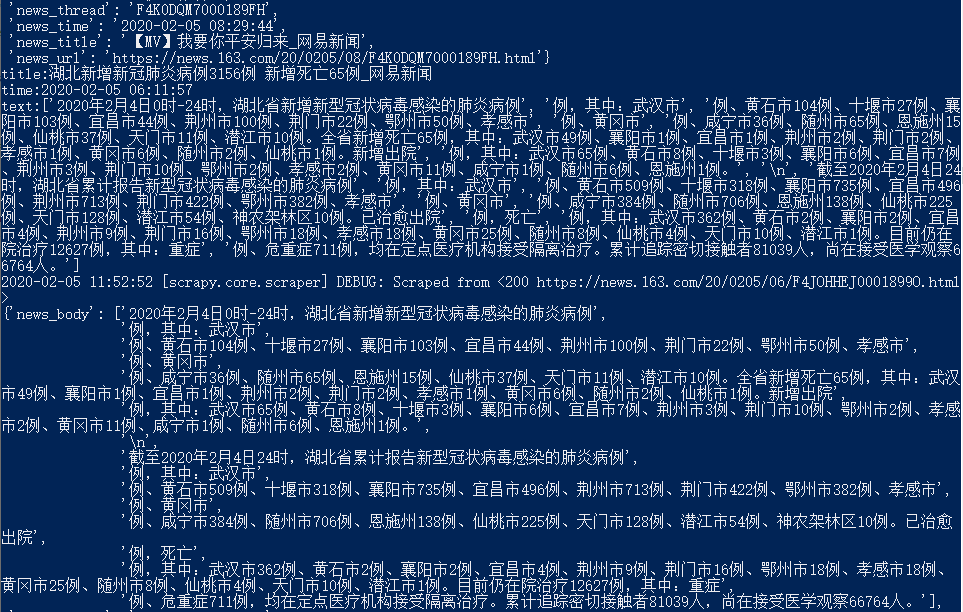
保存后,运行命令行输出如下( 注意、注意、注意, 在调试的过程中不要频繁的运行这个指令,否则会导致服务器无法访问),只截取部分输出结果
5. 修改pipeline文件下的内容
5.1 导入csv文件储存包
要将数据储存在本地,需要以一种格式作为储存的条件,逗号分隔符(csv)文件就可以满足这种要求,而且也是现在主要存储数据的工具
from scrapy.exporters import CsvItemExporter
5.2 定义进程函数
首先从初始化函数,包含了创建收集数据的文件和项目启动器
def __init__(self): self.file = open('news_data.csv', 'wb') self.exporter = CsvItemExporter(self.file, encoding = 'utf-8') self.exporter.start_exporting()
其次,定义爬虫结束器,进行项目的收尾工作,把进程和文件都关闭掉,防止内存溢出
def close_spider(self,spider): self.exporter.finish_exporting() self.file.close()
最后在处理函数里面,开启导入,最后返回Item
def process_item(self, item, spider): self.exporter.export_item(item) return item
至此,pipeline里的代码编写就已经完成了,这时候就要在setting.py文件里面进开启pipeline通道,取消如下内容的注释,如下

最后整个pipeline.py的文件代码如下,注意检查缩进的问题(Sublime编辑器里面有讲缩进全部转换成为tab格式的选项,确保缩进一致,而且还是要注意一下网页编码的问题,否则会出现乱码的情况,encoding要根据爬取网页的编码格式设定)
from scrapy.exporters import CsvItemExporter
class NewsPipeline(object):
def __init__(self): self.file = open('news_data.csv', 'wb') self.exporter = CsvItemExporter(self.file, encoding = 'gbk') self.exporter.start_exporting()
def close_spider(self,spider): self.exporter.finish_exporting() self.file.close()
def process_item(self, item, spider): self.exporter.export_item(item) return item
6. 运行结果
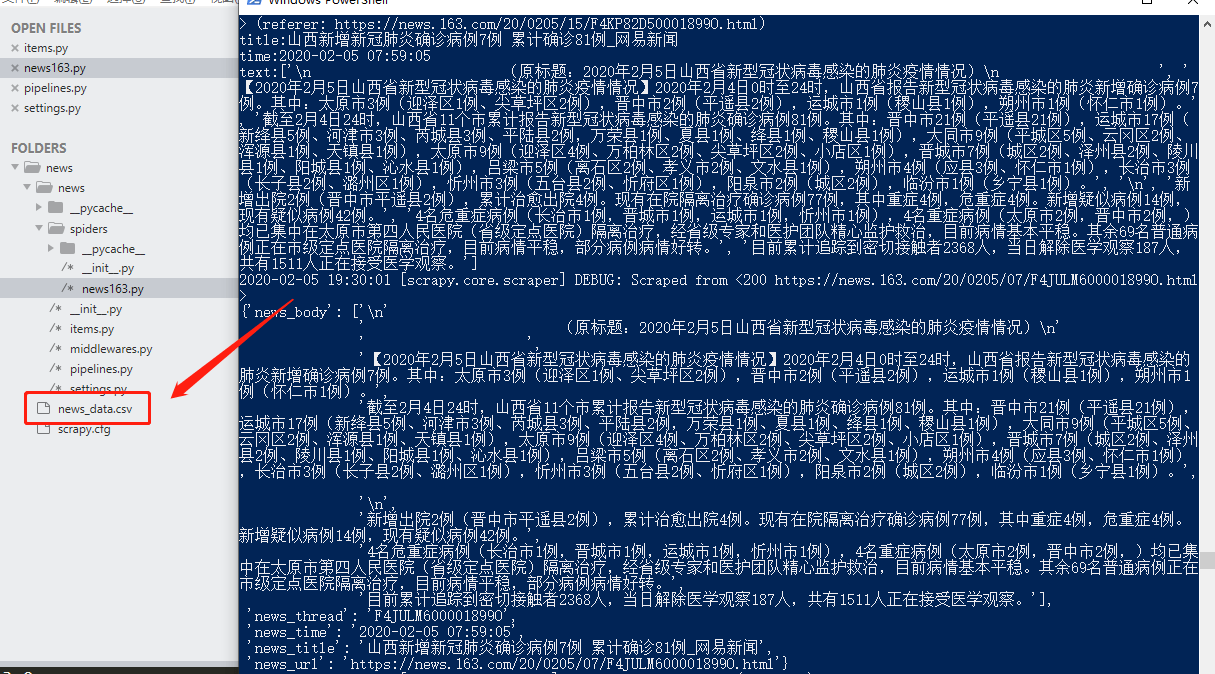
最后在命令行窗口,运行指令,在窗口界面出现爬取内容输出的同时,在news文件夹下也自动生成了news_data.csv文件,如下
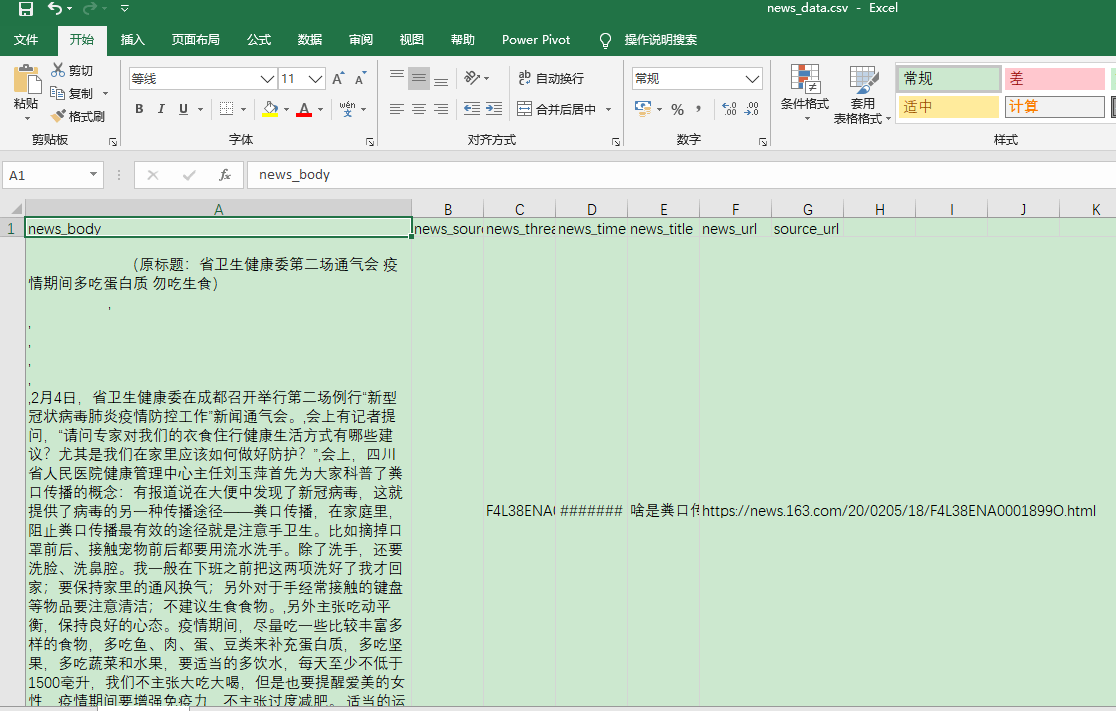
news_data.csv文件中数据样式如下,至此整个利用Scrapy爬取网页新闻的项目就全部完结了
神龙|纯净稳定代理IP免费测试>>>>>>>>天启|企业级代理IP免费测试>>>>>>>>IPIPGO|全球住宅代理IP免费测试


