首先,在教程(二)(http://blog.csdn.net/u012150179/article/details/32911511)中,研究的是爬取单个网页的方法。在教程(三)(http://blog.csdn.net/u012150179/article/details/34441655)中,讨论了Scrapy核心架构。现在在(二)的基础上,并结合在(三)中提到的爬取多网页的原理方法,进而进行自动多网页爬取方法研究。
并且,为了更好的理解Scrapy核心架构以及数据流,在这里仍采用scrapy.spider.Spider作为编写爬虫的基类。
首先创建project:
scrapy startproject CSDNBlog
一. items.py编写
在这里为清晰说明,只提取文章名称和文章网址。
# -*- coding:utf-8 -*-
from scrapy.item import Item, Field
class CsdnblogItem(Item): """存储提取信息数据结构"""
article_name = Field() article_url = Field()
二. pipelines.py编写
import json import codecs
class CsdnblogPipeline(object):
def __init__(self): self.file = codecs.open('CSDNBlog_data.json', mode='wb', encoding='utf-8')
def process_item(self, item, spider): line = json.dumps(dict(item)) + '\n' self.file.write(line.decode("unicode_escape"))
return item
其中,构造函数中以可写方式创建并打开存储文件。在process_item中实现对item处理,包含将得到的item写入到json形式的输出文件中。
三. settings.py编写
对于setting文件,他作为配置文件,主要是至执行对spider的配置。一些容易被改变的配置参数可以放在spider类的编写中,而几乎在爬虫运行过程中不改变的参数在settings.py中进行配置。
# -*- coding:utf-8 -*-
BOT_NAME = 'CSDNBlog'
SPIDER_MODULES = ['CSDNBlog.spiders'] NEWSPIDER_MODULE = 'CSDNBlog.spiders'
#禁止cookies,防止被ban COOKIES_ENABLED = False
ITEM_PIPELINES = { 'CSDNBlog.pipelines.CsdnblogPipeline':300 }
# Crawl responsibly by identifying yourself (and your website) on the user-agent #USER_AGENT = 'CSDNBlog (+http://www.yourdomain.com)'
这里将COOKIES_ENABLED参数置为True,使根据cookies判断访问的站点不能发现爬虫轨迹,防止被ban。
ITEM_PIPELINES类型为字典,用于设置启动的pipeline,其中key为定义的pipeline类,value为启动顺序,默认0-1000。
四. 爬虫编写
爬虫编写始终是重头戏。原理是分析网页得到“下一篇”的链接,并返回Request对象。进而继续爬取下一篇文章,直至没有。
上码:
#!/usr/bin/python # -*- coding:utf-8 -*-
# from scrapy.contrib.spiders import CrawlSpider,Rule
from scrapy.spider import Spider from scrapy.http import Request from scrapy.selector import Selector from CSDNBlog.items import CsdnblogItem
class CSDNBlogSpider(Spider): """爬虫CSDNBlogSpider"""
name = "CSDNBlog"
#减慢爬取速度 为1s download_delay = 1 allowed_domains = ["blog.csdn.net"] start_urls = [
#第一篇文章地址 "http://blog.csdn.net/u012150179/article/details/11749017" ]
def parse(self, response): sel = Selector(response)
#items = [] #获得文章url和标题 item = CsdnblogItem()
article_url = str(response.url) article_name = sel.xpath('//div[@id="article_details"]/div/h1/span/a/text()').extract()
item['article_name'] = [n.encode('utf-8') for n in article_name] item['article_url'] = article_url.encode('utf-8')
yield item
#获得下一篇文章的url urls = sel.xpath('//li[@class="next_article"]/a/@href').extract() for url in urls: print url url = "http://blog.csdn.net" + url print url yield Request(url, callback=self.parse)
慢慢分析:
(1)download_delay参数设置为1,将下载器下载下一个页面前的等待时间设置为1s,也是防止被ban的策略之一。主要是减轻服务器端负载。
(2)从response中抽取文章链接与文章题目,编码为utf-8。注意yield的使用。
(3)抽取“下一篇”的url,由于抽取后缺少http://blog.csdn.net部分,所以补充。两个print只为调试,无实际意义。重点在于
yield Request(url, callback=self.parse)
也就是将新获取的request返回给引擎,实现继续循环。也就实现了“自动下一网页的爬取”。
五. 执行
scrapy crawl CSDNBlog
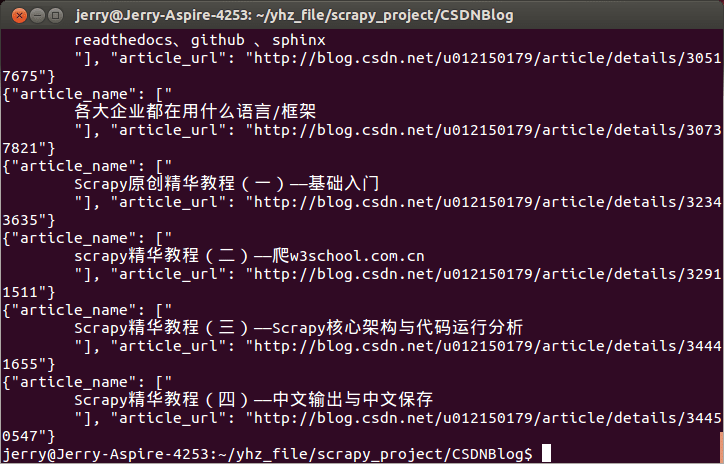
部分存储数据截图:

原创,转载注明:http://blog.csdn.net/u012150179/article/details/34486677
神龙|纯净稳定代理IP免费测试>>>>>>>>天启|企业级代理IP免费测试>>>>>>>>IPIPGO|全球住宅代理IP免费测试


