网址:https://www.rmfysszc.gov.cn/statichtml/rm_obj/108362.shtml
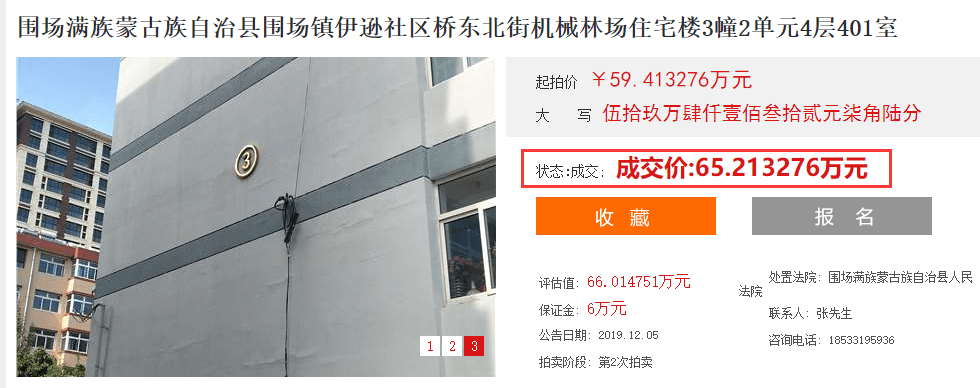
用
请求出的网页解析为
<div id="time1" style="width:100%; height:60px; text-indent:30px; font-size:14px; line-height:60px;color:#2f2f2f;font-family:'SimSun'">
<span id="wen" style="">距开始</span><span id="time" style="margin-left:10px; "></span> <img style="" src="/Images/时钟.png" />
</div>
from selenium import webdriver
import requests
from scrapy.http import HtmlResponse
from scrapy.selector import Selector
headers = {"User-Agent": choice(
[
"Mozilla/5.0 (Windows NT 10.0; Win64; x64; rv:67.0) Gecko/20100101 Firefox/67.0",
"Mozilla/5.0(Windows;U;WindowsNT6.1;en-us)AppleWebKit/534.50(KHTML,likeGecko)Version/5.1Safari/534.50",
"Mozilla/5.0(Macintosh;IntelMacOSX10_7_0)AppleWebKit/535.11(KHTML,likeGecko)Chrome/78.0.3904.97 Safari/535.11"
]),
"X-Forwarded-For": str(randint(0, 255)) + "." + str(randint(0, 255)) + "." + str(
randint(0, 255)) + "." + str(randint(0, 255))
}
driver = webdriver.Chrome()
url = "https://www.rmfysszc.gov.cn/statichtml/rm_obj/108362.shtml"
driver.get(url=url)
res = requests.get(url=url, headers=headers)
res.encoding = res.apparent_encoding
print(res.text)
driver.close()
解决办法:
方法一:
可以通过使用HtmlResponse来获取状态及成交价
from scrapy.http import HtmlResponse
from scrapy.selector import Selector
res = HtmlResponse(url=url, body=driver.page_source, headers=headers, encoding="utf-8")
print(res.xpath('//*[@id="time1"]').extract())
# ['<div id="time1" style="width:100%; height:60px; text-indent:30px; font-size:14px; line-height:60px;color:#2f2f2f;font-family:\'SimSun\'">状态:成交; <span class="ti">成交价:65.213276万元</span></div>']
stats = Selector(text=res.text).css('div#time1::text').extract()
print(stats) # ['状态:成交; ']
price = Selector(text=res.text).css('span.ti::text').extract()
print(price) # ['成交价:65.213276万元']
driver.close()
方法二:
1、查找获取内容所在位置,找到class或者id属性

2、查找id或者class
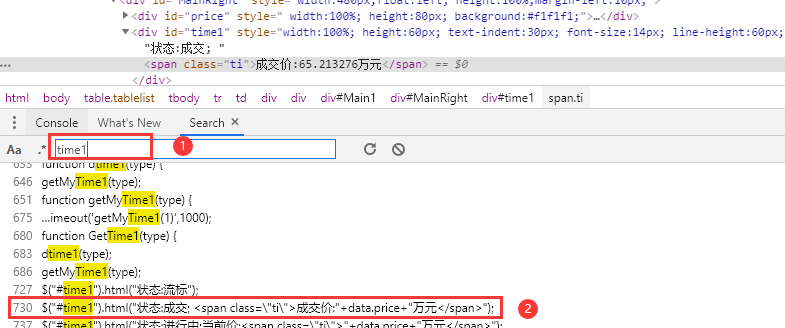
3、点击2中的步骤2
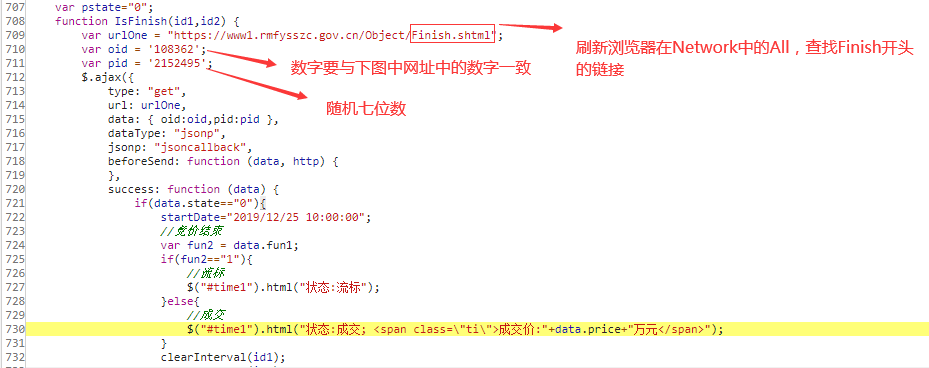
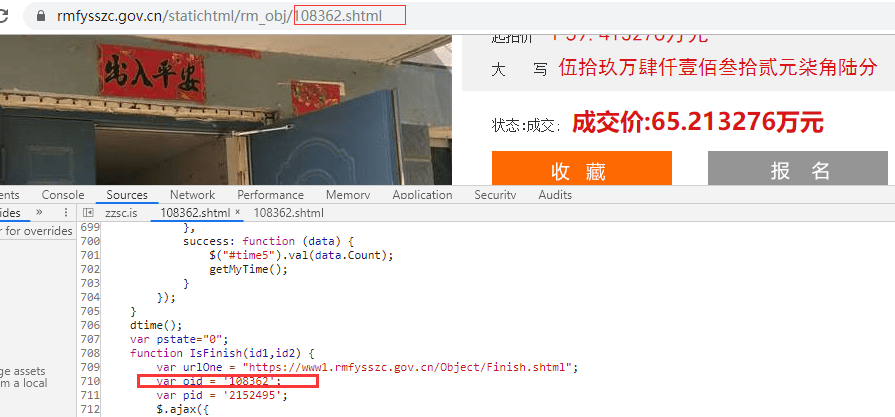
从图中看出是使用Ajax渲染,
4、点击Network,选中ALL,重新加载页面,在查找栏输入3中的urlOne中的框部分
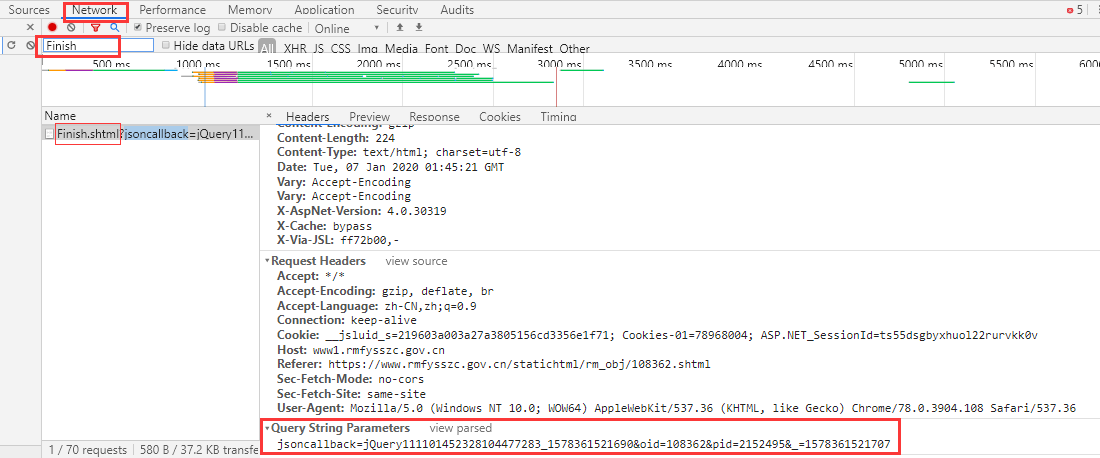
from selenium import webdriver
import requests
import re
from random import random, randint
import time
headers = {"User-Agent": choice(
[
"Mozilla/5.0 (Windows NT 10.0; Win64; x64; rv:67.0) Gecko/20100101 Firefox/67.0",
"Mozilla/5.0(Windows;U;WindowsNT6.1;en-us)AppleWebKit/534.50(KHTML,likeGecko)Version/5.1Safari/534.50",
"Mozilla/5.0(Macintosh;IntelMacOSX10_7_0)AppleWebKit/535.11(KHTML,likeGecko)Chrome/78.0.3904.97 Safari/535.11"
]),
"X-Forwarded-For": str(randint(0, 255)) + "." + str(randint(0, 255)) + "." + str(
randint(0, 255)) + "." + str(randint(0, 255))
}
start_url = "https://www.rmfysszc.gov.cn/statichtml/rm_obj/108362.shtml"
jsoncallback = randint(10 ** 21, 10 ** 22 – 1)
oid = re.findall('/([0-9]+).shtml', start_url)[0]
fir_time = int(time.time() * 1000)
sec_time = fir_time + 60 # 第二个时间要大于第一个时间
pid = randint(10 ** 7, 10 ** 8 – 1)
driver = webdriver.Chrome()
url = "https://www1.rmfysszc.gov.cn/Object/Finish.shtml?jsoncallback=jQuery{jsoncallback}_{fir_time}&oid={oid}&pid={pid}&_={sec_time}".format(
jsoncallback=jsoncallback, fir_time=fir_time, oid=oid, pid=pid, sec_time=sec_time)
driver.get(url=url)
res = requests.get(url=url, headers=headers)
res.encoding = res.apparent_encoding
print(
res.text) # jQuery111101452328104477283_1578361521690({state:'0',time:'2019-12-24 10:20:15',price:'65.213276',fun1:'0'})
price = re.findall("price:'(.*?)'", res.text)[0] # 0
stat = re.findall("state:'(.*?)'", res.text)[0] # 65.213276
time_ = re.findall("time:'(.*?)'", res.text)[0] # 2019-12-24 10:20:15
print(stat, price, time_) # 0 65.213276 2019-12-24 10:20:15
driver.close()
关于AJAX数据爬取,参考文章https://www.cnblogs.com/zheng1076/p/11133695.html
神龙|纯净稳定代理IP免费测试>>>>>>>>天启|企业级代理IP免费测试>>>>>>>>IPIPGO|全球住宅代理IP免费测试


